-
Table of Contents
“Achieve Crystal Clarity: Expert Tips for Layering Resin Without Yellowing!”
Layering resin can create stunning, multi-dimensional effects in your projects, but one common challenge is preventing yellowing over time. Yellowing can detract from the clarity and vibrancy of your work, making it essential to adopt strategies that maintain the resin’s original appearance. This guide offers practical tips for layering resin effectively while minimizing the risk of discoloration, ensuring your creations remain beautiful and true to color for years to come.
Proper Curing Techniques for Clear Resin
When working with clear resin, achieving a flawless finish is paramount, particularly when layering to create depth and dimension in your projects. One of the most significant challenges faced by artisans is the yellowing of resin, which can detract from the aesthetic appeal of the final product. To mitigate this issue, it is essential to employ proper curing techniques that not only enhance the clarity of the resin but also ensure its longevity.
To begin with, understanding the curing process is crucial. Curing is the chemical reaction that occurs when resin and hardener are mixed, leading to the hardening of the material. This process is influenced by various factors, including temperature, humidity, and the ratio of resin to hardener. Therefore, it is advisable to follow the manufacturer’s instructions meticulously, as deviations can lead to incomplete curing or undesirable results. For instance, using too much hardener can accelerate the curing process, potentially leading to a cloudy appearance, while insufficient hardener may result in a tacky surface.
Moreover, temperature plays a vital role in the curing process. Ideally, resin should be cured in a controlled environment where the temperature remains between 70°F and 80°F (21°C to 27°C). If the temperature is too low, the curing process may slow down, leading to a longer working time and an increased risk of dust and debris settling on the surface. Conversely, high temperatures can cause the resin to cure too quickly, resulting in bubbles and imperfections. Therefore, maintaining a stable temperature is essential for achieving a clear finish.
In addition to temperature, humidity levels can significantly impact the curing process. High humidity can introduce moisture into the resin, which may lead to cloudiness or a milky appearance. To avoid this, it is advisable to work in a low-humidity environment, ideally below 50%. If working indoors, using a dehumidifier can help regulate moisture levels, ensuring that the resin cures properly without interference from environmental factors.
Another critical aspect of proper curing techniques is the application of thin layers. When layering resin, it is recommended to apply multiple thin coats rather than a single thick layer. This approach not only allows for better control over the curing process but also minimizes the risk of heat buildup, which can lead to yellowing. Each layer should be allowed to cure fully before applying the next, ensuring that the underlying layers are solid and free from imperfections. This method not only enhances clarity but also contributes to the overall strength of the finished piece.
Furthermore, selecting high-quality resin products that are specifically formulated to resist yellowing can make a significant difference. Many manufacturers offer UV-resistant resins that contain additives designed to protect against the harmful effects of sunlight. By choosing these products, artisans can enhance the longevity and clarity of their work, ensuring that it remains vibrant over time.
In conclusion, achieving a clear and beautiful finish when layering resin requires careful attention to curing techniques. By maintaining optimal temperature and humidity levels, applying thin layers, and selecting high-quality materials, artisans can significantly reduce the risk of yellowing. Ultimately, these practices not only enhance the aesthetic appeal of resin projects but also contribute to their durability, allowing creators to showcase their work with confidence.
Choosing UV-Resistant Resin Products
When embarking on a resin project, one of the most critical considerations is the selection of UV-resistant resin products. This choice is paramount, especially for projects that will be exposed to sunlight or other sources of ultraviolet light. UV exposure can lead to yellowing, which not only diminishes the aesthetic appeal of the finished piece but can also compromise its structural integrity over time. Therefore, understanding the characteristics of UV-resistant resins is essential for achieving a durable and visually appealing result.
To begin with, it is important to recognize that not all resin products are created equal. Some resins are specifically formulated to resist UV degradation, while others may not offer the same level of protection. When selecting a resin, look for products that explicitly state their UV resistance on the label. Manufacturers often conduct tests to determine the longevity of their resins when exposed to UV light, and this information can be invaluable in making an informed decision. Additionally, many reputable brands provide detailed specifications regarding their products, including the degree of UV resistance, which can further guide your selection process.
Moreover, it is beneficial to consider the type of resin you are using. Epoxy resins, for instance, are popular for their clarity and strength, but they can be prone to yellowing if not formulated with UV inhibitors. Conversely, polyester resins may offer better UV resistance but can be less clear and more brittle. Therefore, understanding the properties of each type of resin will help you choose the most suitable option for your specific project needs. Furthermore, some manufacturers offer hybrid formulations that combine the best attributes of both epoxy and polyester resins, providing enhanced UV protection without sacrificing clarity.
In addition to selecting the right resin, it is also crucial to pay attention to the curing process. Proper curing is essential for maximizing the UV resistance of the resin. When resin is not cured correctly, it may not achieve its full potential in terms of durability and resistance to yellowing. Therefore, always follow the manufacturer’s instructions regarding mixing ratios, curing times, and environmental conditions. For instance, curing in a controlled environment with stable temperatures and humidity levels can significantly enhance the performance of the resin.
Furthermore, applying a UV-resistant topcoat can provide an additional layer of protection against yellowing. Many artists and craftsmen opt to finish their resin projects with a clear UV-resistant varnish or sealant. This not only enhances the visual appeal of the piece but also acts as a barrier against harmful UV rays. When selecting a topcoat, ensure that it is compatible with the resin you have used, as some products may react negatively with certain types of resin.
In conclusion, choosing UV-resistant resin products is a fundamental step in preventing yellowing and ensuring the longevity of your resin projects. By carefully selecting the right type of resin, adhering to proper curing techniques, and considering additional protective measures such as topcoats, you can significantly enhance the durability and aesthetic quality of your work. Ultimately, investing time and effort into these considerations will yield a finished product that not only meets your artistic vision but also stands the test of time against the damaging effects of UV exposure.
Best Practices for Surface Preparation Before Layering
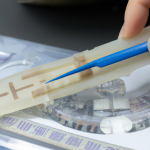
When working with resin, achieving a flawless finish is paramount, particularly when layering to create depth and dimension in your projects. One of the most critical aspects of successful resin layering is proper surface preparation, which can significantly influence the final appearance and longevity of the piece. To begin with, it is essential to ensure that the surface is clean and free from contaminants. Dust, oils, and residues can interfere with the adhesion of subsequent layers, leading to imperfections and potential yellowing over time. Therefore, using a lint-free cloth and a suitable cleaning solution, such as isopropyl alcohol, can effectively remove any unwanted particles and prepare the surface for optimal bonding.
In addition to cleanliness, the surface texture plays a vital role in the layering process. A smooth surface is generally preferred, as it allows for better adhesion between layers. However, if the previous layer is too glossy, it may hinder the bonding process. To address this, lightly sanding the surface with fine-grit sandpaper can create a slightly roughened texture, enhancing the mechanical bond between layers. After sanding, it is crucial to clean the surface again to remove any dust generated during the process. This step ensures that the new layer adheres properly without any interference from residual particles.
Moreover, temperature and humidity are significant factors that can affect the curing process of resin. Ideally, working in a controlled environment where the temperature is between 70°F and 80°F (21°C to 27°C) and humidity levels are low can help prevent issues such as yellowing and improper curing. High humidity can lead to moisture being trapped within the resin, which not only affects clarity but can also result in a cloudy appearance. Therefore, monitoring environmental conditions before and during the layering process is essential for achieving the best results.
Another important consideration is the choice of resin. Not all resins are created equal, and some are more prone to yellowing than others. Selecting a high-quality, UV-resistant resin can significantly reduce the risk of discoloration over time. Additionally, incorporating UV stabilizers or additives specifically designed to combat yellowing can further enhance the longevity of the finish. It is advisable to consult product specifications and reviews to ensure that the resin chosen is suitable for the intended application.
Furthermore, allowing adequate curing time between layers is crucial. Rushing this process can lead to issues such as bubbling or incomplete adhesion, which can compromise the integrity of the final piece. Following the manufacturer’s guidelines for curing times and ensuring that each layer is fully cured before applying the next will contribute to a more durable and aesthetically pleasing result.
Lastly, it is beneficial to conduct a test on a small sample piece before committing to a larger project. This practice allows for adjustments in technique and materials, ensuring that the final outcome meets expectations without the risk of costly mistakes. By adhering to these best practices for surface preparation, artists and crafters can significantly enhance their chances of achieving a beautiful, layered resin finish that remains clear and vibrant over time. Ultimately, attention to detail in the preparation phase lays the foundation for a successful resin project, allowing creativity to shine through without the hindrance of yellowing or imperfections.
Q&A
1. **What type of resin should I use to minimize yellowing?**
Use UV-resistant epoxy resin, as it is specifically formulated to resist yellowing over time.
2. **How can I prevent yellowing during the curing process?**
Cure the resin in a cool, dark environment away from direct sunlight and UV light exposure.
3. **What additives can help reduce yellowing in resin layers?**
Incorporate UV stabilizers or inhibitors into the resin mixture to enhance its resistance to yellowing.To prevent yellowing when layering resin, ensure you use high-quality, UV-resistant resin, work in a controlled environment with stable temperatures, and avoid direct sunlight during the curing process. Additionally, applying thin layers, allowing proper curing time between layers, and using a clear topcoat can further protect against discoloration. Following these tips will help maintain the clarity and longevity of your resin projects.